

C++ 에서는 스마트 포인터라는 것을 사용하여 포인터를 더욱 안전하고 효율적으로 사용할 수 있습니다.
스마트 포인터에는 다음과 같이 3가지가 존재합니다.
- unique_ptr
- shared_ptr
- weak_ptr
기존의 포인터의 경우에는 new와 delete가 한 쌍으로 사용되었으나 프로그래머의 실수로 delete를 하지 않게 될 경우에는 메모리 누수로 이어졌습니다.
하지만 스마트 포인터는 기본적으로 참조가 없어질 때 메모리를 비워줍니다.
(RAII - Resource Acquisition Is Initialization)
오늘은 이 스마트 포인터 중 unique_ptr을 먼저 소개합니다.
단 하나의 포인터 (unique_ptr) (C++11)
unique_ptr은 단 하나의 소유권을 가지며 해당 소유권을 가진 포인터만이 소멸에 관여할 수 있습니다.
template<class T, class Deleter = std::default_delete<T>>
class unique_ptr;

template<class T, class Deleter>
class unique_ptr<T[], Deleter>;
소유권의 개념이 들어오게 되면 다음과 같은 문제를 방지할 수 있습니다.
#include <iostream>
#include <memory>

int main(void)
{
    double* pdNum1 = new double(1.1);
    double* pdNum2 = pdNum1;

    // ... 많은 소스 생략 ...

    delete pdNum1;
    pdNum1 = nullptr;

    delete pdNum2;		// <-- 오류 발생!!
    pdNum2 = nullptr;

    return 0;
}pdNum1M과 pdNum2는 new double(1.1)을 가리키고 있으나 프로그래머의 실수로 pdNum2를 delete 하는 오류를 범했습니다.
unique_ptr은 이런 문제를 사전에 미리 방지할 수 있습니다.
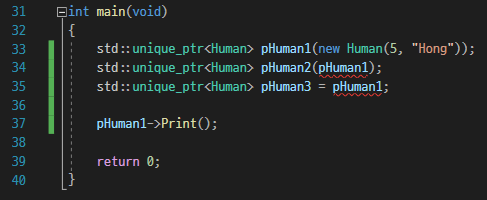
에초에 처음에 소유권(생성)을 얻은 unique_ptr를 제외한 나머지 포인터에서 참조할 수 없습니다.
unique_ptr의 소멸
unique_ptr은 더 이상 사용하지 않게 되면 소멸하게 됩니다.
#include <iostream>
#include <memory>
#include <string>

using namespace std;

class Human
{
private:
    int m_nAge;
    string m_strName;

public:
    Human(int nAge = 0, string strName = "")
        : m_nAge(nAge), m_strName(strName)
    {
        printf("  Human 생성 (%d, %s)\n", nAge, strName.c_str());
    }

    ~Human()
    {
        printf("  Human 소멸 (%d, %s)\n", m_nAge, m_strName.c_str());
    }

    void Print()
    {
        printf("  Age : %d, Name : %s\n", m_nAge, m_strName.c_str());
    }

    void PrintReverse()
    {
        printf("  Name : %s, Age : %d\n", m_strName.c_str(), m_nAge);
    }
};

int main(void)
{
    // 1번 Scope
    {
        std::unique_ptr<Human> pHuman1(new Human(5, "Hong"));

        pHuman1->Print();
        pHuman1->PrintReverse();
    }

    // 2번 Scope
    {
        std::unique_ptr<Human> pHuman2(new Human(11, "Kim"));

        pHuman2->Print();

        // 3번 Scope
        {
            std::unique_ptr<Human> pHuman3(new Human(20, "Lee"));

            pHuman3->Print();
        }

        pHuman2->PrintReverse();
    }

    return 0;
}위와 같은 상황에서 unique_ptr인 pHuman1은 pHuman1->PrintReverse()를 수행한 후 자동으로 소멸됩니다.
(자신이 속한 Scope를 벗어나면, 더 이상 사용하지 않게 되면 소멸 됩니다.)

unique_ptr의 주소 (get())
현재 unique_ptr의 주소는 get()함수를 이용하여 알 수 있습니다.
// 함수 형식
pointer get() const noexcept;현재 unique_ptr이 가리키는 포인터를 가리킵니다.
여기서는 Human* 을 반환하게 되죠.
#include <iostream>
#include <memory>
#include <string>

using namespace std;

class Human
{
private:
    int m_nAge;
    string m_strName;

public:
    Human(int nAge = 0, string strName = "")
        : m_nAge(nAge), m_strName(strName)
    {
        printf("  Human 생성 (%d, %s)\n", nAge, strName.c_str());
    }

    ~Human()
    {
        printf("  Human 소멸 (%d, %s)\n", m_nAge, m_strName.c_str());
    }

    void Print()
    {
        printf("  Age : %d, Name : %s\n", m_nAge, m_strName.c_str());
    }
};

int main(void)
{
    std::unique_ptr<Human> pHuman1(new Human(5, "Hong"));
    printf("  pHuman1 Address : %p\n", pHuman1.get());

    printf("\n");

    std::unique_ptr<Human> pHuman2(new Human(10, "Lee"));
    printf("  pHuman2 Address : %p\n", pHuman2.get());

    return 0;
}
이것을 이용하여 포인터를 인자로 받는 함수에도 활용할 수 있습니다.
#include <iostream>
#include <memory>
#include <string>

using namespace std;

class Human
{
private:
    int m_nAge;
    string m_strName;

public:
    Human(int nAge = 0, string strName = "")
        : m_nAge(nAge), m_strName(strName)
    {
        printf("  Human 생성 (%d, %s)\n", nAge, strName.c_str());
    }

    ~Human()
    {
        printf("  Human 소멸 (%d, %s)\n", m_nAge, m_strName.c_str());
    }

    void Print()
    {
        printf("  Age : %d, Name : %s\n", m_nAge, m_strName.c_str());
    }
};

void PrintHuman(Human* pHuman)
{
    pHuman->Print();
}

int main(void)
{
    std::unique_ptr<Human> pHuman1(new Human(5, "Hong"));
    PrintHuman(pHuman1.get());

    return 0;
}
unique_ptr 소유권 이임 (std::move())
unique_ptr의 소유권을 이임하여 다른 unique_ptr가 접근하도록 할 수 있습니다.
바로 표준 라이브러리에 있는 move()함수를 이용하는 것입니다.
std::move 함수
한 객체가 다른 객체로 이동할 수 있음을 나타내는 데 사용하는 함수로 다른 객체로 리소스를 옮기는데 효율적으로 사용됩니다.
(A is used to indicate that an object t may be "moved from", i.e. allowing the efficient transfer of resources from t to another object.)
이때 xvalue를 생성하게 되는데 이 xvalue로 인해서 소유권이 효율적으로 넘어가게 됩니다.
(xvalue는 값을 식별(Identity)할 수 있으며, 값을 메모리에서 옮길 수 있는 value)
// C++11 에서의 std::move
template< class T >
typename std::remove_reference<T>::type&& move( T&& t ) noexcept;

// C++14 에서의 std::move
template< class T >
constexpr std::remove_reference_t<T>&& move( T&& t ) noexcept;
참고 자료
std::move - cppreference.com
(since C++11) (until C++14) (since C++14) std::move is used to indicate that an object t may be "moved from", i.e. allowing the efficient transfer of resources from t to another object. In particular, std::move produces an xvalue expression that identifies
en.cppreference.com
Value categories - cppreference.com
Each C++ expression (an operator with its operands, a literal, a variable name, etc.) is characterized by two independent properties: a type and a value category. Each expression has some non-reference type, and each expression belongs to exactly one of th
en.cppreference.com
#include <iostream>
#include <memory>
#include <string>

using namespace std;

class Human
{
private:
    int m_nAge;
    string m_strName;

public:
    Human(int nAge = 0, string strName = "")
        : m_nAge(nAge), m_strName(strName)
    {
        printf("  Human 생성 (%d, %s)\n", nAge, strName.c_str());
    }

    ~Human()
    {
        printf("  Human 소멸 (%d, %s)\n", m_nAge, m_strName.c_str());
    }

    void Print()
    {
        printf("  Age : %d, Name : %s\n", m_nAge, m_strName.c_str());
    }

    void PrintReverse()
    {
        printf("  Name : %s, Age : %d\n", m_strName.c_str(), m_nAge);
    }
};

int main(void)
{
    // Human(5, "Hong")의 소유권 : pHuman1
    std::unique_ptr<Human> pHuman1(new Human(5, "Hong"));
    pHuman1->Print();

    // Human(5, "Hong")의 소유권이임 : pHuman1 -> pHuman2
    std::unique_ptr<Human> pHuman2 = std::move(pHuman1);
    pHuman2->Print();

    return 0;
}std::unique_ptr<Human> pHuman2(std::move(pHuman1));을 이용하여 pHuman1 에서 pHuman2로 소유권을 이임했습니다.
여기서 주의할 점은 pHuman1은 더 이상 소유권을 가지고 있지 않기 때문에 pHuman1으로 기존에 소유하고 있던 new Human(5, "Hong")을 접근하려고 하면 안됩니다.
unique_ptr을 안전하게 생성하기 (std::make_unique())
C++14 부터는 unique_ptr을 생성할 때 표준 라이브러리 함수인 make_unique()로 생성하도록 권장하고 있습니다.
template<class T, class... Args>
std::enable_if_t<!std::is_array<T>::value, std::unique_ptr<T>> make_unique(Args&&... args)
{
    return std::unique_ptr<T>(new T(std::forward<Args>(args)...));
}

template<class T>
std::enable_if_t<detail::is_unbounded_array_v<T>, std::unique_ptr<T>> make_unique(std::size_t n)
{
    return std::unique_ptr<T>(new std::remove_extent_t<T>[n]());
}이것을 이용하여 생성하여보면
#include <iostream>
#include <memory>
#include <string>

using namespace std;

class Human
{
private:
    int m_nAge;
    string m_strName;

public:
    Human(int nAge = 0, string strName = "")
        : m_nAge(nAge), m_strName(strName)
    {
        printf("  Human 생성 (%d, %s)\n", nAge, strName.c_str());
    }

    ~Human()
    {
        printf("  Human 소멸 (%d, %s)\n", m_nAge, m_strName.c_str());
    }

    void Print()
    {
        printf("  Age : %d, Name : %s\n", m_nAge, m_strName.c_str());
    }
};

void PrintHuman(Human* pHuman)
{
    pHuman->Print();
}

int main(void)
{
    std::unique_ptr<Human> pHuman1 = std::make_unique<Human>(10, "Soo");
    // 또는 auto pHuman1 = std::make_unique<Human>(10, "Soo");

    PrintHuman(pHuman1.get());

    return 0;
}이렇게 사용할 수 있습니다.

참고 자료
std::unique_ptr - cppreference.com
(1) (since C++11) template < class T, class Deleter > class unique_ptr ; (2) (since C++11) std::unique_ptr is a smart pointer that owns and manages another object through a pointer and disposes of that object when the unique_ptr goes out of sco
en.cppreference.com
방법: unique_ptr 인스턴스 만들기 및 사용
자세한 정보: 방법: unique_ptr 인스턴스 만들기 및 사용
learn.microsoft.com
'Study > C++' 카테고리의 다른 글
| [C++11] 스마트 포인터3 (weak_ptr) (0) | 2022.09.21 |
|---|---|
| [C++11] 스마트 포인터2 (shared_ptr) (1) | 2022.09.20 |
| [C++] std::array (C++ 표준 라이브러리 배열 컨테이너 이야기) (0) | 2022.09.18 |
| [C++] Google 공룡 게임 만들어보기 (2) | 2022.02.05 |
| [C++] 데이터 직렬화 라이브러리 씨리얼(Cereal) (0) | 2021.03.25 |